From V. Bryant, Journal of Helminthology, 1973, 3:263-268.
Heligmosomoides polygyrus is a trichostrongylid nematode found in small rodents. It's life cycle is direct and involves both free-living and parasitic stages.
Larvae
Eggs contain fully developed larvae 28 hours after being laid. The larvae can be observed moving vigorously within the egg shell. The eggs hatch after 36-37 hours giving rise to to first stage larvae. 28-29 hours after hatching, the L1 larvae molt to give rise to the L2 larval stage. A partial molt occurs 17-20 hours later giving rise to ensheathed L3 infective stage larvae. The L3 are active but non-feeding.
Parasitic stages
Within 24 hrs of infection by gavage, no larvae could be found in the intestinal lumen indicating that the larvae had shed their sheath and penetrated the intestinal mucosa.
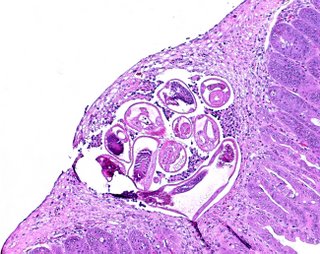
The fourth larval molt takes place about 90-96 hrs after infection. The next molt takes place about 144-166 hrs after infection. By 191 hours most of the worms have passed from the mucosa into the intestinal lumen.
Worms were observed in copula and the first eggs detected in the host feces by 240 hours of infection. The life cycle, from egg to egg, takes about 325 hrs or 13.5 days.
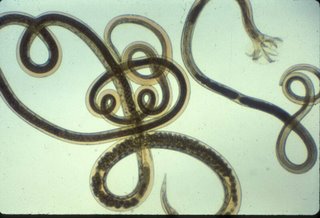
Male and female adult worms. Copulatory bursa can be seen at the posterior end of the male adult worm (smaller worm to the right). The posterior end of the female adult worm is similar to that of an L4. Eggs can be seen in the posterior third of the female adult (larger worm to the left).
Prior descriptions of the Heligmosomoides polygyrus life cycle were described by M.A.M. Famy, 1956, Z. ParasitKde; F.A. Ehrenford, 1954, J. Parasitol. and G.M. Spurlock, 1943, J. Parasitol.
Remember, Heligmosomoides polygyrus was known as Nematospiroides dubius in the early literature.
Monday, April 03, 2006
Infecting Mice
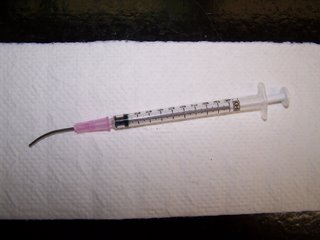
Mice are infected by gavage (per os) using a blunted tip needle (18 g) that can be commercially obtained or you can make your own. To make your own gavage needle, completely blunt the tip of an 18 g needle using a file or grinder. Be sure the needle is completely polished and does not contain any burrs that could lacerate the mouse's esophogus. Carefully bend the needle into a very shallow curve (a picture of a 'homemade' needle will be posted).
To achieve the appropriate larval concentration, perform the following:
1. Place the larval suspension in a small beaker (10-30ml) containing a small magnetic stir bar.
2. With continual mixing withdraw an aliquot (50 - 100 ul) using the 1 ml syringe and gavage needle that will be used to infect the mice.
NOTE: The stir bar must rotate with sufficient speed to effect thorough mixing but not so fast as to create centripetal forces which concentrate the larvae in a vortex. It is also important the dosing syringe is always placed at the same location in the beaker and at the same angle when withdrawing aliquots for larval counts.
3. Adjust volume of larval suspension with distilled water to approximate final concentration (x no. of larvae/0.2 ml).
4. Make 5 counts. Counts should not vary more than 10% above or below the mean.
5. Mice are typically infected with 100-150 larvae (source mice with 200 larvae). Work quickly after filling syringe with larvae as they settle very fast. The major source of variability in infecting mice is INCONSISTENCY.
6. Depending on the mouse strain, about 70-80% of the innoculated larvae will survive to adulthood.
7. For egg source mice infect male, thy1.1 BALB/C mice with 200 larvae. You will get good egg production for about 2 months.
Culturing Heligmosomoides polygyrus
Wire bottom is made of stainless steel 1 cm mesh. The mesh stands on stainless steel bolts.
A method for obtaining clean infective larvae can be found in C.H. Burren, 1980, Zeitschrift fur Parasitenkunde, 62:111-112. Don't worry, it's in english.
This is the protocol I use.
1. Place infected source mice in a wire-bottom cage with a collection tray or bottom of cage lined with moist paper toweling. The paper towel should be moist enough to keep the feces from drying out but not so wet as to make the pellets mushy. Leave drinking water in the cage but not food.
Place well moistened paper towel on cage bottom then the wire mesh.
2. Collect feces for 2-5 hours then harvest the pellets.
Add the infected source mice, cover the cage and wait.
This many fecal pellets from 5 infected BALB/C mice collected for 2 hours.
3. Scrape the pellets into a 50 ml centrifuge tube using a small spatula.
Gently gather the pellets into a pile and scoop them into the 50 ml tube. I use two applicator sticks to mash up the feces into a smooth paste.
3. Add about 0.5-1 ml distilled water to the tube and mash the pellets into a smooth paste.
5. Fill the 50 ml tube containing the fecal slurry with distilled water, shake to suspend the feces and centrifuge at 250 rpm (11 g) for 2 minutes.
You can spin faster if you want, my old protocol called for 2000 rpm but I cannot find any eggs in the supernatant fluid when I spin at 250 rpm and a slower spin allows you to remove more of the 'fines'
6. Aspirate the supernatant fluid down to the pellet and fill the tube with distilled water.
7. Repeat '5' and '6' at twice.
8. Resuspend the fecal pellet with 50 ml distilled water and pour it into a 2nd 50 ml tube through a double layer of gauze. This will remove much of the fecal matter but allow the majority of the nematode eggs to pass through the gauze. Squeeze the gauze/fecal matter to remove all retentate and centrifuge as described in step 5.
9. Aspirate the supernatant fluid down to the pellet. Pour the remaining sediment onto 5-6 layers of moistened Whatman 40 filter paper in a culture dish. Be sure to moisten the filter paper prior to pouring the fecal slurry.
It's fun to sample the culture everyday and follow the larval development. You can find larvae inside the eggs, followed by unsheathed larvae, followed by ensheathed L3 infective larvae.
10. Place the cultures at room temperature and mist them every day or so with distilled water to keep them moist.
11. After 7-8 days in culture, lift the filter paper with forceps and spray the bottom of the filter paper with distilled water. Remove the filter paper, tilt the culture dish and spray the surface of the dish from top to bottom. Collect the water containing the larvae into a clear 10 ml tube. Fill the tube with distilled water, if necessary and centrefuge at 250g for 2 minutes. Carefully aspirate the supernatant fluid being careful not to aspirate the pellet of larvae. Repeat 3 times.
12. Store the larvae in a 10 ml tube at 4 degrees C. The larvae keep for several weeks.
Any questions?
Subscribe to:
Posts (Atom)